I had the opportunity to attend the
National Association of Elevator Contractors (NAEC’s) 75th annual convention September 23rd to 26th. It was great to get back and see some old friends, meet new friends, sit through education, be involved with talking points and walk around and visit about 300 different vendors. With Illinois adopting the 2022 code, it was of particular interest to know what is on the horizon and how our vendors can support us.
75th Anniversary & United show - This was a big show for many reasons; because it was held on the East Coast, it was the NAEC’s 75th Anniversary & a United show. When we have the show on the East Coast we see a ton of field personnel come in for a day to visit. The NAEC celebrated its 75th Anniversary so it was a special year for us. Also, every few years we have a “United” show which includes NAEC, CECA (Canadian Elevator Contractors Association), Elevator U (a group focused on colleges and universities) & IAEC (International Association of Elevator Consultants).
What did I get out of it? On a regular basis I’m asked what do I get out of going to the convention or other NAEC events. I had a list of items from our office to look into since you can talk face to face with industry suppliers. Meeting people face to face is different than trading emails or even phone calls. Challenges that occur over the year can be discussed and resolved in a matter of minutes. The networking is wonderful, seeing friendly faces and talking to people that you email on a regular basis cannot be beat. What I get the most out of is seeing my peers from independent contractors and seeing what is going on in their area and what they are doing and what challenges they are facing.
*I did not attend the real day one which was a great education day and some great parties!
Day 1 – Wednesday – The convention doors opened and it was huge this year! Some of my highlights are as follows: Seeing World Electronics Dover DMC repair parts and talking about the obsolescence on many other platforms[some they address some they do not]. I took a look at a pretty solid pressure sensitive pit ladder from S2 Source since it will be required with the 2022 code. Saw a pretty rad car from Webb Electronics who have a pretty detailed communications solution. Talked with the Victaulic people about their products.
I also said hi to our friends at Adams Elevator Inc and got a run down about their door lock monitoring solutions, also required by the 2022 code, which they have refined after the challenges of New York City's adoption of this code. Very impressed with the engineer who designed this. I went to the Hyperion booth and had some good discussions with one of our long time material providers, then did a racing simulation where I got last place. I spent some time with Alpha Elevator and bumped into some old friends from Capital Elevator out of Sacramento. I saw our friends at Formula Systems and the door operator we helped install and actually made it work!
We won an
Ellie for Best Contractor - North. Thanks Elevator World for letting us participate. Kings III took the cake at the award ceremony with their matching jump suits. I went over to Smartrise Inc to see what was new with their controllers. Saw some of our oldest friends from Motion Control Engineering (MCE) and saw their destination dispatch and solution to Kone's MRL. At night we went out to some great parties from Alpha Elevator and CED Electronics [thanks for letting us crash your parties].
[Thank you sponsors]
[The gates open!]
[A few of World Boards]
[A17.1 2022 pit ladder option]
[Cool Car - Cool tech]]
[Everyone needs one of these]
[Cool solution by a lady engineer! Very Impressed!]
[Steve Smartrise[Hyperion] smokes us]
[Our friends at Alpha]
[Our friends at Formula Systems]
[Kings III took the cake and an Ellie with their outfits]
[Diane from Midwest Elevator lost her marbles and tried to take our Ellie]
[Our friends at Smartrise Engineering]
[MCE's destination dispatch]
[Kone mono/eco MRL solution]
[MCE's traction controllers]
[CED's party overlooked the beach and wheel]
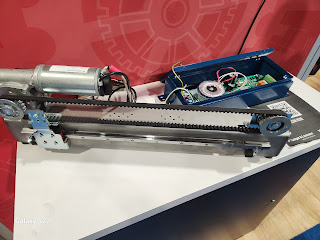
Day 2 – Thursday – I went to the awards breakfast, it was packed! Afterwards it was a day packed with elevator door operators. I saw a new Wurtec residential door operator, took a look at the Otis Glide A linear operator, revisited the new freight door operator interface from EMS, which was slick, looked at Columbia's take on a replacement of the GAL door operator with one by Fermator, took some pictures with our Dennis Finn and the Ellie, which was really the Imperial Electric Ellie (we had a prankster over at their booth the previous day), looked at Elevator Product Corp's (EPCO’s) answer to the TKE buttons that constantly break.
[Packed breakfast]
[Wurtec's residential door operator]
[What a power unit looks like inside]
[Otis Blackbelt and AT 400 solution Otis Glide A]
[EmS FRT doors new interface - Well done!]
[Columbia/Fermator answer to GAL]
[Columbia/Fermator answer to GAL]
[Picture with the wrong Ellie]
[EPCOs answer to proprietary buttons]
[Canton's submersible power unit]
Why you should go – If you're in the elevator industry, this is
THE show to attend where you can meet the best in the business, exchange ideas, get challenged, and come back to your company with new ideas, see new products and be a better elevator person. Maybe you'll meet
Elevator Pal Ed?
2025 Convention – Houston, TX
2026 Convention – Chicago, IL - Yes its coming to our home.
If you have any questions or would like additional information feel free to contact me at
CraigZ@colleyelevator.com or 630-766-7230 ext. 107.
Also check us out on Instagram @Colleyelevator see what we have been up to.


