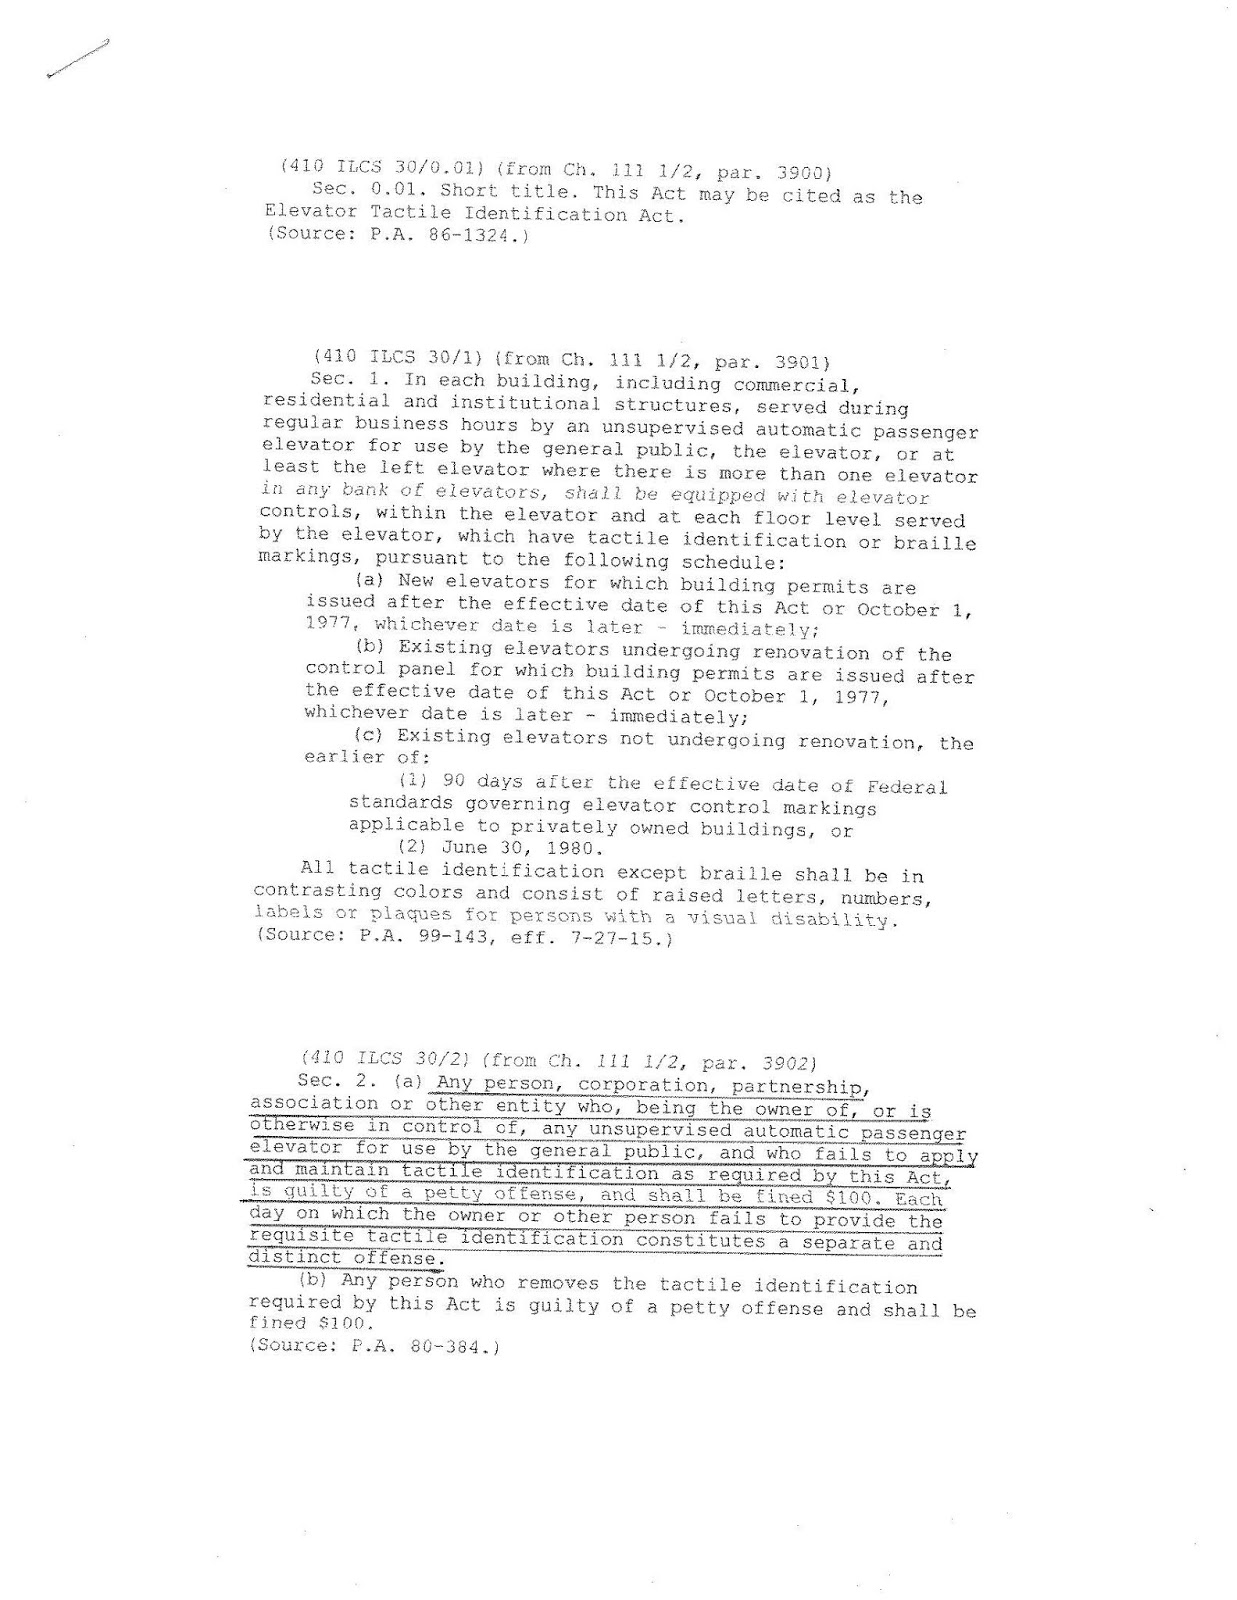
This
is meant to be a guide for general contractors when working with an elevator
contractor for a new installation. We
work with GC’s or CM’s that have a variety of experience doing elevators from
doing them on a regular basis to being their first one.
[As contractors we look forward to the day we have a truck onsite]
1st
rule – Do not building your elevator
hoistway without final drawings – Under no circumstance should anyone
building a hoist way without a final drawing.
All elevator systems are not the same.
The mason will need to install connection devices[inserts, tube steel,
etc] in certain places in the hoistway.
The most important thing is you may not build the hoistway for the
elevator you ultimately purchase so it would go from a vanilla installation
price to a custom price because the company you hired doesn’t use the same foot
print. I.E. use a Kone MRL foot print
and end up deciding not to work with Kone, If you building the hoistway for the
Kone elevator, you may have a huge problem with additional costs.
If
you are not familiar with elevator drawings have the elevator contractor come
out and walk you through what you need.
We are not building a rocket ship but we are building something that
requires many different trades to work together.
Hoistway entrances – Pay attention to the
rough opening we will need and keep the entrance that we will be installing the
cab in open so we can get the platform in.
[Wonderful! The 1st landing HW entrance is open]
Hoistway
inserts/connections
– Make sure you know where to put them in the hoist way. As a GC or CM, you may know but whomever is
going to be installing them should also have a good understanding before they
begin constructing the hoistway. On
construction sites I get a lot of “yeah I do this all the time” and people
shaking their heads and we still have inserts installed in the wrong place. If
you have alternate means of connecting the rails to the hoistway work with your
contractor on a solution, do not assume it will work because the
architect/design team said it will.
[Typical wall insert in CMU]
[This building is using tube steel instead of CMU inserts]
Have the elevator pit
ready to go
– Make sure your pit is 48” or 60” or whatever it says on the drawings. You will also need a sump pump that can pump
3000ga per hour, have the hole in. If
you have questions on where it goes, call your elevator contractor for direction and do not put it where you
think it should go, put it where the elevator contractor tells you or where the
drawings show. We have items that go in
the pit that are need to go in a certain spot.
Priority 1 is an elevator installation not making life easy for the
concrete guy or the plumber.
[A prepreconstruction site visit to meet the CM/GC - Pit is getting ready]
[Pit ended up beautiful]
[A recent site visit when a GC told me the hoisway/pit was ready]
Main line power – When you expect the
elevator contractor to start, make sure you have main line power and lights in
the elevator room. Please do not tell us
you have power when you do not, we will come out and work for 8 hours and then
tell you to call us back when you have power and most companies charge you with
a remobilization charge. Lights in the
machine room are important as well. Know
your electrical clearances and where the elevator equipment will be placed
before installing the disconnects.
110vac power in pit and
machine room –
Our tools need to plug into something it is helpful when we have live power in
the machine room and our pit so we can avoid stringing extension cords all over
your building.
Environmental controls – We love
environmental controls HVAC! Be aware
when these are being installed the #1 priority is elevator installation not
making life easier for the HVAC guy. We
have a controller and machine that needs to be placed somewhere if we have a
machine room. In picture we see we have
this wonderful air conditioner with water pipes everywhere. We do not want water pipes in our machine
room.
[Love the HVAC, don't love the water pipes]
Phone line – Get your phone line
ready. You can use a POTs line, VOIP,
Cellular or whatever. When we start have
it waiting and have it be live! We don’t
want to get to the end of the project and not be able to get the elevator
inspection because there is no 2 way communication.
Hoist beam – If you want to make
friends with your elevator project crew put the beam where it is supposed to be
on the drawings. This will make the
project go faster and safer.
[This beam is very important to us when doing our installation]
Staging & delivery- clear out a space
for the elevator contractor so when he starts he has a clear and safe space. Also please have means to have our large and heavy equipment to be unloaded.
[Not a great staging area]
[We appreciate it when we have a clear means to deliver equipment - This construction site did not have a clear means for us to get material in the building]
Trade meeting – Get the trades
together to discuss their scopes and have them ask questions and go over
drawings. The meeting is not about the vanity of the general contractor,
building owner or elevator contractor it is about the successful installation
of a conveyance system that requires all parties to do their part.
[This was a construction meeting that included all trades involved]
Before
approving drawings understand what is mentioned on the lay out drawings. No matter how many elevators you have
installed please read what is on the new installation front page.
Hoistway and pit
1.
A
clear hoistway to the dimensions on the drawing, plumb within ½” to 1”
total. Hoistway shown is minimum. Any out of plumb condition must not encroach
on hoistway size envelope from top to bottom
2.
Venting
of hoistway as required by code
3.
A
dry pit reinforced to sustain vertical loads as shown.
4.
A
pit ladder for each elevator of non combustible material, constructed and
installed in accordance with code, and extending from pit floor to 48” above
sill of lowest hoistway door.
5.
Adequate
supports for guide rail brackets, to support horizontal loads as shown. Support locations must not exceed spacing as
required by code, and as shown. When
maximum spacing is exceeded, rail reinforcement, or added supports must be
provided at purchaser’s expense.
6.
Guide
rail support location must be steel, brick, concrete, or filled concrete
block. Inserts, if used, are supplied
and installed by others, in locations shown, as walls are erected. If rail brackets are attached to steel beams,
fire proofing is to be applied after rail brackets are installed.
7.
Permanent
provisions shall be made to prevent accumulation of water in hoistway pit per
ASME A17.1
8.
Projections
or recesses in hoistway of 4” or more, on sides not used for loading or
unloading, shall be beveled at an angle not less than 75 degrees from the
horizontal.
9.
A
hoist beam, book or eyebolt shall be furnished at the top of hoisway located on
centerline of car and guides – designed for load capacity of 6000lbs minimum.
10.
Entrance
walls accepting passenger type entrances are to be erected(or rough opening as
shown filled in] after door frames and sills are installed
11.
A
suitable sill support and recess as shown, full width of hoistway, grouted by
others after door sills are installed.
12.
Required
sleeves in hoistway walls, or any trenching and filling, for oil line and wire
duct for each elevator, as shown.
13.
Any
cutting and patching of building construction required to install signal
fixtures or other elevator apparatus and any repairs, grouting, patching or
painting made necessary by same
14.
Barricades
may be required during construction – hoistway protection
15.
Hoistway
shall have means to maintain temperature between 40 degrees and 105 degrees
Control Space
16.
A
properly lit and ventilated control space per code requirements, with temperature
maintained between 55 degrees and 90 degrees.
Door size show to permit access for machine.
17.
Machine
room to be designed and laid out to comply with electrical clearance
requirements and maintenance clearance requirements. Elevator contractor’s equipment is priority
here not the plumber, HVAC, electrician, security or fire alarm equipment. If their equipment is in the way, they will
need to move it.
Electrical & pit –
All electrical in accordance with ASME and NEC
18.
A
fused disconnect switch for each elevator, of ample capacity, wirth wiring to
the elevator motor starter control.
Disconnecting means shall disconnect the normal power supply as well as
emergency supply, when provided.
19.
Light
and switch in elevator control space, with switch located adjacent ot the
access door. Convenience outlet in
control space[GFI].
20.
Light,
switch and convenience outlet in elevator pit, light switch accessible from
lower landing opening. Install light to
clear elevator car.
21.
Suitable
110v service in the hoistway, midway of travel[see layout] or connected to
terminals in elevator controller for car light service[elevator contractor
option]
22.
Heat,
and product combustion sensors located in each elevator lobby with necessary
wiring to elevator control panel, when fire service is required
23.
If
sprinklers are present in the control space or hoistway, a means shall be provided
to automatically disconnect the mainline power supply prior to the application
of wire[shunt trip].
24.
All
items shall conform to local building code
25.
Relative
humidity not to exceed 85%
Take away - If we all work together and follow the general guide lines given by a good/competent elevator contractor/new construction team we can go from a muddy construction site to a beautiful lobby with running elevators.
[beginning]
[End]
If
you have any questions or would like additional information feel free to
contact me at CraigZ@colleyelevator.com or
630-766-7230 ext. 107.
Also
check us out on Instagram @Colleyelevator see what we have been up to.